Difference between revisions of "Configuring Blacklists in EasyMail"
Your guide to pathway services
m (Protected "Configuring Blacklists in EasyMail" ([Edit=Allow only administrators] (indefinite) [Move=Allow only administrators] (indefinite)) [cascading]) |
|||
| Line 20: | Line 20: | ||
<li>From the Rule pane, select '''Blacklist'''.</li> | <li>From the Rule pane, select '''Blacklist'''.</li> | ||
</ol> | </ol> | ||
| + | |||
| + | |||
| + | |||
| + | [[File:Easymail blacklist1.png|none|Easymail blacklist1.png]] | ||
| + | |||
| + | == Editing your Blacklist<br/> == | ||
| + | |||
| + | <span style="color:#0000ff">Perform steps 1-3 from the '''Viewing your Blacklist '''section before performing the steps below.</span> | ||
Revision as of 14:11, 27 January 2015
EasyMail allows users to add and delete Blacklist entries.
Viewing your Blacklist
To view your Blacklist:
- Log in to EasyMail.
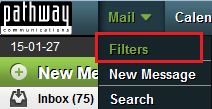
- From the Mail dropdown tab, click Filters.
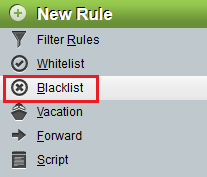
- From the Rule pane, select Blacklist.
Editing your Blacklist
Perform steps 1-3 from the Viewing your Blacklist section before performing the steps below.


