Difference between revisions of "Setting up Fetchmail"
Your guide to pathway services
m |
|||
| (8 intermediate revisions by 2 users not shown) | |||
| Line 1: | Line 1: | ||
| − | With Fetchmail, you can retrieve emails from a remote POP3 or IMAP account and put them into a local mailbox. | + | With '''Fetchmail''', you can retrieve emails from a remote POP3 or IMAP account and put them into a local mailbox. |
| + | |||
| + | |||
To set up fetchmail: | To set up fetchmail: | ||
| − | # | + | #Click on the '''Email''' tab. |
| − | # | + | #Locate the '''Fetchmail''' pane. |
| + | #Click '''Fetchmail'''. | ||
#Click '''Add new Account'''. | #Click '''Add new Account'''. | ||
| − | |||
| − | |||
| − | |||
| − | |||
| − | |||
| − | + | [[File:Add new fetchmail.png|none|Add new fetchmail.png]] | |
| − | + | ||
| − | + | ||
| − | + | ||
| − | + | When you arrive at the '''Get Email''' page: | |
| − | + | ||
| − | + | ||
| − | | | + | |
| − | | | + | |
| − | + | ||
| − | + | ||
| − | + | ||
| − | + | ||
| − | + | ||
| − | + | ||
| − | + | ||
| − | + | ||
| − | + | ||
| − | + | ||
| − | + | ||
| − | + | ||
| − | + | ||
| − | + | ||
| − | + | ||
| − | + | ||
| − | + | ||
| − | + | ||
| − | + | ||
| − | + | ||
<ol start="5"> | <ol start="5"> | ||
| − | <li>Click '''Save''' | + | <li>From the '''Type '''dropdown list, select the protocol that will be used to retrieve emails from the remote account.</li> |
| + | <li>In the '''Pop3/Imap Server '''field, enter the hostname of the remote mail server.</li> | ||
| + | <li>In the '''Username '''field, enter the username of the remote email account.</li> | ||
| + | <li>In the '''Password''' field, enter the user's password.</li> | ||
| + | <li>Select the '''Delete emails after retrieval '''checkbox to automatically delete retrieved emails.</li> | ||
| + | <li>Select the '''Retrieve all emails '''checkbox to retrieve all emails, including read emails.</li> | ||
| + | <li>From the '''Destination '''dropdown list, select the email address to forward emails to.</li> | ||
| + | <li>Select the '''Active '''fetchmail checkbox to activate fetchmail. To deactivate fetchmail unselect the checkbox.</li> | ||
| + | <li>Click '''Save.'''</li> | ||
</ol> | </ol> | ||
| + | |||
| + | |||
| + | |||
| + | [[File:Fetchmail screen.png|none|Fetchmail screen.png]] | ||
Latest revision as of 13:03, 7 November 2016
With Fetchmail, you can retrieve emails from a remote POP3 or IMAP account and put them into a local mailbox.
To set up fetchmail:
- Click on the Email tab.
- Locate the Fetchmail pane.
- Click Fetchmail.
- Click Add new Account.
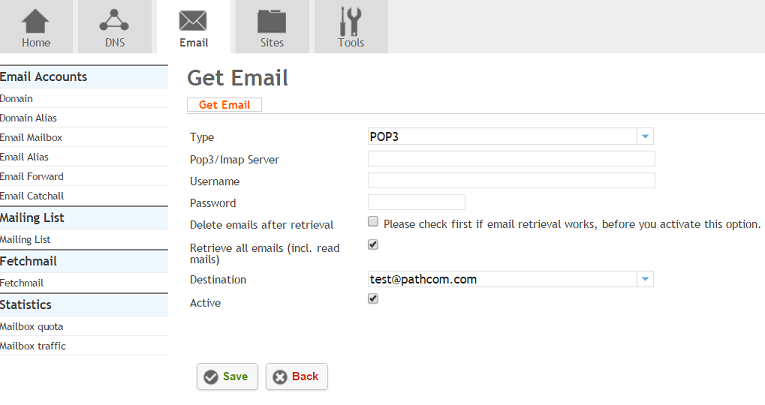
When you arrive at the Get Email page:
- From the Type dropdown list, select the protocol that will be used to retrieve emails from the remote account.
- In the Pop3/Imap Server field, enter the hostname of the remote mail server.
- In the Username field, enter the username of the remote email account.
- In the Password field, enter the user's password.
- Select the Delete emails after retrieval checkbox to automatically delete retrieved emails.
- Select the Retrieve all emails checkbox to retrieve all emails, including read emails.
- From the Destination dropdown list, select the email address to forward emails to.
- Select the Active fetchmail checkbox to activate fetchmail. To deactivate fetchmail unselect the checkbox.
- Click Save.


