Difference between revisions of "Adding mailboxes to an email domain"
Your guide to pathway services
| (3 intermediate revisions by 2 users not shown) | |||
| Line 3: | Line 3: | ||
<br/>To add a mailbox: | <br/>To add a mailbox: | ||
| − | + | #Click on the '''Email''' tab. | |
| − | + | #Locate the '''Email Accounts''' pane. | |
| − | # | + | |
| − | #Locate '''Email Accounts'''. | + | |
#Select '''Email Mailbox'''. | #Select '''Email Mailbox'''. | ||
#<div class="floatnone">Click '''Add new Mailbox'''.<br/></div> | #<div class="floatnone">Click '''Add new Mailbox'''.<br/></div> | ||
| − | <div class="floatnone"><br/></div><div class="floatnone"><br/></div><div class="floatnone">[[File:Add mailbox1.PNG|none|Add mailbox1.PNG]]<br/></div><div class="floatnone"><br/></div><div class="floatnone"><br/></div><div class="floatnone"> | + | <div class="floatnone"><br/></div><div class="floatnone"><br/></div><div class="floatnone">[[File:Add mailbox1.PNG|none|Add mailbox1.PNG]]<br/></div><div class="floatnone"><br/></div><div class="floatnone">When you arrive at the '''Mailbox '''page:<br/></div><div class="floatnone"><ol start="5"> |
| − | + | ||
| − | + | ||
| − | + | ||
| − | <ol start="5"> | + | |
<li>''(Optional) ''In the '''Name '''field, enter the name of the person assigned to the mailbox.</li> | <li>''(Optional) ''In the '''Name '''field, enter the name of the person assigned to the mailbox.</li> | ||
| − | <li>In the '''Email '''field;</li> | + | <li>In the '''Email '''field:<ol start="1" style="list-style-type: lower-alpha;"> |
| + | <li>create an email alias in the '''Alias '''field. (E.g. ''johndoe''<span style="display: none" data-cke-bookmark="1"> </span>''')'''</li> | ||
| + | <li>from the '''Domain''' dropdown list, select a domain to point the mailbox to. (E.g. ''qwert.us'')</li> | ||
| + | </ol></li> | ||
</ol> | </ol> | ||
| − | |||
| − | |||
| − | |||
| − | |||
<ol start="7"> | <ol start="7"> | ||
<li>In the '''Password''' field, create a password for the mailbox. (If you click '''Generate Password''' a strong password will be randomly created for you.)</li> | <li>In the '''Password''' field, create a password for the mailbox. (If you click '''Generate Password''' a strong password will be randomly created for you.)</li> | ||
| Line 28: | Line 21: | ||
<li>From the '''Spamfilter''' dropdown list, select a filtering option.</li> | <li>From the '''Spamfilter''' dropdown list, select a filtering option.</li> | ||
<li>Select the '''Enable Receiving '''checkbox to activate this function for the mailbox. To deactivate this function unselect the checkbox.</li> | <li>Select the '''Enable Receiving '''checkbox to activate this function for the mailbox. To deactivate this function unselect the checkbox.</li> | ||
| − | <li>Select the '''Disable IMAP '''checkbox to deactivate this function for the mailbox. To activate this function unselect the checkbox.</li> | + | <li>Select the '''Disable SMTP (sending) '''checkbox to deactivate this function for the mailbox (only do this if you want SMTP disabled). To activate this function unselect the checkbox.</li> |
| − | <li>Select the '''Disable POP3''' checkbox to deactivate this function for the mailbox. To activate this function unselect the checkbox.</li> | + | <li>Select the '''Disable IMAP '''checkbox to deactivate this function for the mailbox (only do this if you want IMAP disabled). To activate this function unselect the checkbox.</li> |
| + | <li>Select the '''Disable POP3''' checkbox to deactivate this function for the mailbox (only do this if you want POP3 disabled). To activate this function unselect the checkbox.</li> | ||
<li>Click '''Save'''.</li> | <li>Click '''Save'''.</li> | ||
</ol> | </ol> | ||
</div> | </div> | ||
| − | + | <br/><br/>[[File:HostPath add mailbox1.png]] | |
| − | + | ||
| − | <br/>[[File: | + | |
Latest revision as of 09:55, 28 April 2017
After adding an email domain to your website you can begin adding mailboxes.
To add a mailbox:
- Click on the Email tab.
- Locate the Email Accounts pane.
- Select Email Mailbox.
- Click Add new Mailbox.
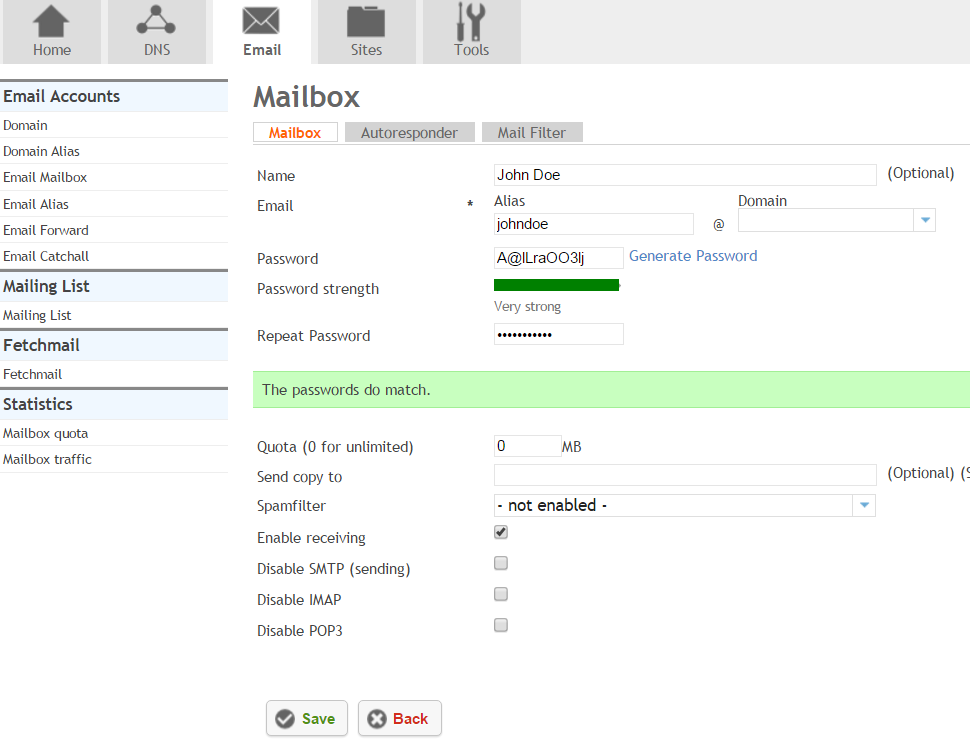
When you arrive at the Mailbox page:
- (Optional) In the Name field, enter the name of the person assigned to the mailbox.
- In the Email field:
- create an email alias in the Alias field. (E.g. johndoe)
- from the Domain dropdown list, select a domain to point the mailbox to. (E.g. qwert.us)
- In the Password field, create a password for the mailbox. (If you click Generate Password a strong password will be randomly created for you.)
- In the Repeat Password field, re-enter the password that you created in the previous step.
- In the Quota field, enter the maximum disk space available for the mailbox in MB.
- (Optional) In the Send copy to field, enter a recipient to recieve an email copy.
- From the Spamfilter dropdown list, select a filtering option.
- Select the Enable Receiving checkbox to activate this function for the mailbox. To deactivate this function unselect the checkbox.
- Select the Disable SMTP (sending) checkbox to deactivate this function for the mailbox (only do this if you want SMTP disabled). To activate this function unselect the checkbox.
- Select the Disable IMAP checkbox to deactivate this function for the mailbox (only do this if you want IMAP disabled). To activate this function unselect the checkbox.
- Select the Disable POP3 checkbox to deactivate this function for the mailbox (only do this if you want POP3 disabled). To activate this function unselect the checkbox.
- Click Save.


