Difference between revisions of "Adding an Email Alias"
Your guide to pathway services
| (13 intermediate revisions by one user not shown) | |||
| Line 1: | Line 1: | ||
| − | An '''email alias''' is a forwarding email address, it automatically allows an email that is sent to an alias to be forwarded to | + | An '''email alias''' is a forwarding email address, it automatically allows an email that is sent to an alias to be forwarded to a specified email address. |
| Line 5: | Line 5: | ||
To add an email alias: | To add an email alias: | ||
| − | + | #Click on the '''Email''' tab. | |
| − | + | #Locate '''Email Accounts'''. | |
| − | # | + | #Click '''Email Alias'''. |
| − | #Locate '''Email Accounts''' | + | |
#Click '''Add new Email alias'''. | #Click '''Add new Email alias'''. | ||
| Line 14: | Line 13: | ||
[[File:Add new email alias.png|none|Add new email alias.png]] | [[File:Add new email alias.png|none|Add new email alias.png]] | ||
| + | |||
| + | When you arrive at the '''Email Alias '''page: | ||
| + | <ol start="5"> | ||
| + | <li>In the '''Email '''field:<ol start="1" style="list-style-type: lower-alpha;"> | ||
| + | <li>create an email alias in the '''Alias '''field. (E.g. ''johndoe''<span style="display: none" data-cke-bookmark="1"> </span>)</li> | ||
| + | <li>from the '''Domain''' dropdown list, select the domain that will be forwarding emails. (E.g. ''example.com'')</li> | ||
| + | </ol></li> | ||
| + | </ol> | ||
| + | <ol start="6"> | ||
| + | <li>From the '''Destination '''dropdown list, select the email address to forward emails to.</li> | ||
| + | <li>Select the '''Active '''checkbox to activate the email alias. To deactivate the email alias unselect the checkbox.</li> | ||
| + | <li>Click '''Save.'''</li> | ||
| + | </ol> | ||
| + | |||
| + | <br/>'''[[File:Email alias screen.png|none|Email alias screen.png]]''' | ||
Latest revision as of 11:12, 7 November 2016
An email alias is a forwarding email address, it automatically allows an email that is sent to an alias to be forwarded to a specified email address.
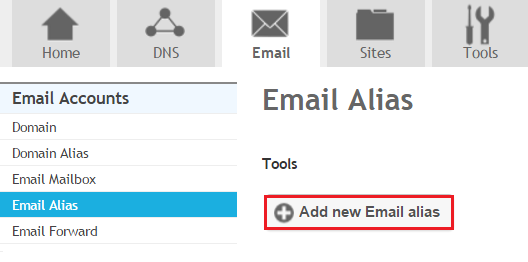
To add an email alias:
- Click on the Email tab.
- Locate Email Accounts.
- Click Email Alias.
- Click Add new Email alias.
When you arrive at the Email Alias page:
- In the Email field:
- create an email alias in the Alias field. (E.g. johndoe)
- from the Domain dropdown list, select the domain that will be forwarding emails. (E.g. example.com)
- From the Destination dropdown list, select the email address to forward emails to.
- Select the Active checkbox to activate the email alias. To deactivate the email alias unselect the checkbox.
- Click Save.


