Difference between revisions of "Downloading backups"
Your guide to pathway services
| (4 intermediate revisions by one user not shown) | |||
| Line 1: | Line 1: | ||
| − | #From the [http://docs.pathcom.com/mediawiki/index.php/Adding_a_Web_Domain | + | #From the [http://docs.pathcom.com/mediawiki/index.php/Adding_a_Web_Domain Web Domain] page, click on the '''Backup''' tab. |
#Go to the '''Existing backups '''section and locate the backed up item that you would like to download. | #Go to the '''Existing backups '''section and locate the backed up item that you would like to download. | ||
| − | #Click'''Download'''. (The backup is placed in the backup directory in your webroot and can be downloaded via FTP.) | + | #Click '''Download'''. (The backup is placed in the backup directory in your webroot and can be downloaded via FTP.) |
| − | + | ||
| − | [[File:Web domain backup1.png | + | [[File:Web domain download backup1.PNG]] |
| + | |||
| + | |||
| + | <ol start="4"> | ||
| + | <li>Locate the '''Web Access''' section, and then click '''FTP-Accounts'''.</li> | ||
| + | </ol> | ||
| + | |||
| + | <br/>[[File:Web domain download backup2.png]] | ||
| + | |||
| + | |||
| + | <ol start="5"> | ||
| + | <li>Locate the FTP account from the '''FTP-User '''list, and then click the FTP server icon.</li> | ||
| + | </ol> | ||
| + | |||
| + | |||
| + | |||
| + | [[File:Web domain download backup3.png]] | ||
| + | |||
| + | |||
| + | <ol start="6"> | ||
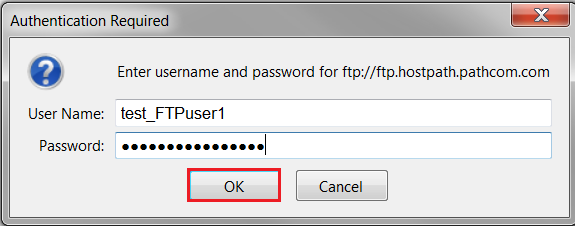
| + | <li>When prompted, enter your FTP username and password, and then click '''OK'''.</li> | ||
| + | </ol> | ||
| + | |||
| + | <span style="color:#0000ff">'''NOTE''': The appearance of the authentication prompt will be different depending on the browser you are using (Firefox was used in this example).</span> | ||
| + | |||
| + | |||
| + | |||
| + | [[File:Web domain access FTP web backup1.png]] | ||
| + | |||
| + | |||
| + | <ol start="7"> | ||
| + | <li>Click '''backup'''.</li> | ||
| + | </ol> | ||
| + | |||
| + | |||
| + | |||
| + | [[File:Web domain access FTP web backup2.png]] | ||
| + | |||
| + | |||
| + | <ol start="8"> | ||
| + | <li>Locate and click the name of the backup file that you would like to download.</li> | ||
| + | </ol> | ||
| + | |||
| + | |||
| + | |||
| + | [[File:Web domain access FTP web backup3.png]] | ||
| + | |||
| + | |||
| + | <ol start="9"> | ||
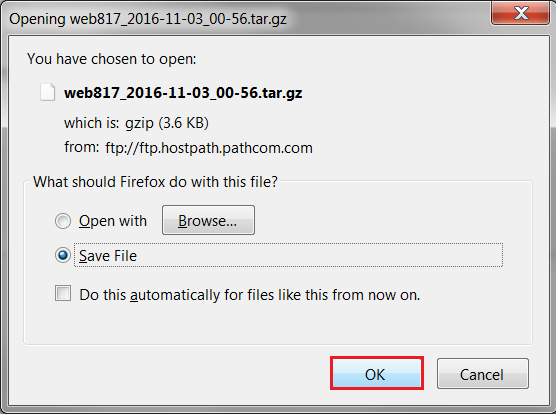
| + | <li>Save the file to your computer, and click '''OK'''.</li> | ||
| + | </ol> | ||
| + | |||
| + | |||
| + | |||
| + | [[File:Web domain access FTP web backup4.png]] | ||
| + | |||
| + | |||
| + | |||
| + | The zipped file will now be saved to your computer. Use a file extraction program like WinRAR, 7Zip, or WinZIP to access the file contents. | ||
Latest revision as of 12:00, 3 November 2016
- From the Web Domain page, click on the Backup tab.
- Go to the Existing backups section and locate the backed up item that you would like to download.
- Click Download. (The backup is placed in the backup directory in your webroot and can be downloaded via FTP.)
- Locate the Web Access section, and then click FTP-Accounts.
- Locate the FTP account from the FTP-User list, and then click the FTP server icon.
- When prompted, enter your FTP username and password, and then click OK.
NOTE: The appearance of the authentication prompt will be different depending on the browser you are using (Firefox was used in this example).
- Click backup.
- Locate and click the name of the backup file that you would like to download.
- Save the file to your computer, and click OK.
The zipped file will now be saved to your computer. Use a file extraction program like WinRAR, 7Zip, or WinZIP to access the file contents.


