Difference between revisions of "Importing an address book to EasyMail"
Your guide to pathway services
| (4 intermediate revisions by one user not shown) | |||
| Line 41: | Line 41: | ||
<ol start="9"> | <ol start="9"> | ||
<li>Select the checkbox if the first row of your CSV file contains content.</li> | <li>Select the checkbox if the first row of your CSV file contains content.</li> | ||
| − | <li> | + | <li>The delimiter and quote character fields can be left alone. Only edit these fields if you have customized your delimiters or quote characters.</li> |
<li>Specify how many columns are in use in your CSV file.</li> | <li>Specify how many columns are in use in your CSV file.</li> | ||
<li>Click '''Next'''.</li> | <li>Click '''Next'''.</li> | ||
| Line 347: | Line 347: | ||
Your file will be added to the address book. | Your file will be added to the address book. | ||
| + | |||
| + | |||
| + | |||
| + | == '''Import a LDIF Address Book file''' == | ||
| + | |||
| + | <br/>To import a LDIF Address Book file: | ||
| + | |||
| + | #Log in to EasyMail. | ||
| + | #Click the the '''Address Book''' tab. | ||
| + | |||
| + | |||
| + | |||
| + | [[File:EasyMail address book tab.png]] | ||
| + | |||
| + | |||
| + | <ol start="3"> | ||
| + | <li>Click '''Import/Export'''.</li> | ||
| + | </ol> | ||
| + | |||
| + | |||
| + | |||
| + | [[File:EasyMail click import-export.png]] | ||
| + | |||
| + | |||
| + | <ol start="4"> | ||
| + | <li>Select '''LDIF Address Book ''' from the '''Select the format of the source file '''dropdown list. </li> | ||
| + | <li>Select the checkbox if you would like to overwrite an existing addressbook. <span style="color:#0000ff;">IMPORTANT: this will delete all the entries in your current address book.</span> </li> | ||
| + | <li>Select an address book from the '''Select the address book to import to '''dropdown list.</li> | ||
| + | <li>Click '''Browse '''to select a file to import.</li> | ||
| + | <li>Click '''Next'''.</li> | ||
| + | </ol> | ||
| + | |||
| + | |||
| + | |||
| + | [[File:EasyMail import LDIF 1.png]] | ||
| + | |||
| + | |||
| + | <ol start="9"> | ||
| + | <li>Select the checkbox if the first row of your file contains content.</li> | ||
| + | <li>The delimiter and quote character fields can be left alone. Only edit these fields if you have customized your delimiters or quote characters.</li> | ||
| + | <li>Specify how many columns are in use in your file.</li> | ||
| + | <li>Click '''Next'''.</li> | ||
| + | </ol> | ||
| + | |||
| + | |||
| + | |||
| + | [[File:EasyMail import addressbook 2.png]] | ||
| + | |||
| + | |||
| + | <ol start="13"> | ||
| + | <li>Select a field from the '''Imported Fields''' list.</li> | ||
| + | <li>Select a matching field from the '''Available Fields''' list. (You don't need to find an exact match.)</li> | ||
| + | <li>Click '''Add Pair'''.</li> | ||
| + | <li>Repeat steps 13 to 15 as many times as required and then proceed to step 17.</li> | ||
| + | </ol> | ||
| + | |||
| + | |||
| + | |||
| + | [[File:EasyMail import csv file 1.png]] | ||
| + | |||
| + | |||
| + | <ol start="17"> | ||
| + | <li>''(Only perform if needed, otherwise proceed to step 18)'' If you need to exclude a pair, select the items from the '''Matching Fields''' lists, and then click '''Remove Pair'''. </li> | ||
| + | </ol> | ||
| + | |||
| + | |||
| + | |||
| + | [[File:EasyMail import csv file 2.png]] | ||
| + | |||
| + | |||
| + | <ol start="18"> | ||
| + | <li>Click '''Next'''.</li> | ||
| + | </ol> | ||
| + | |||
| + | |||
| + | |||
| + | The file will be added to your address book. | ||
Latest revision as of 09:16, 18 April 2016
Address books can be imported into EasyMail. Multiple file formats are accepted.
Contents |
Import a CSV file
To import a CSV address book file:
- Log in to EasyMail.
- Click the the Address Book tab.
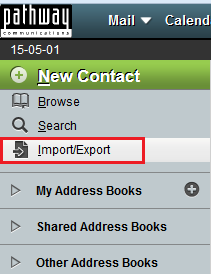
- Click Import/Export.
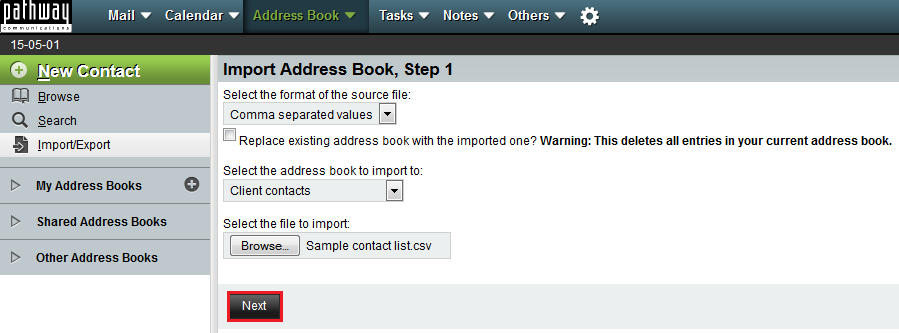
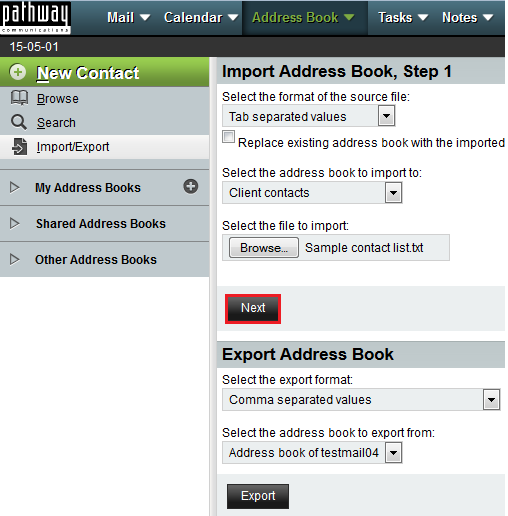
- Select Comma separated values from the Select the format of the source file dropdown list.
- Select the checkbox if you would like to overwrite an existing addressbook. IMPORTANT: this will delete all the entries in your current address book.
- Select an address book from the Select the address book to import to dropdown list.
- Click Browse to select a file to import.
- Click Next.
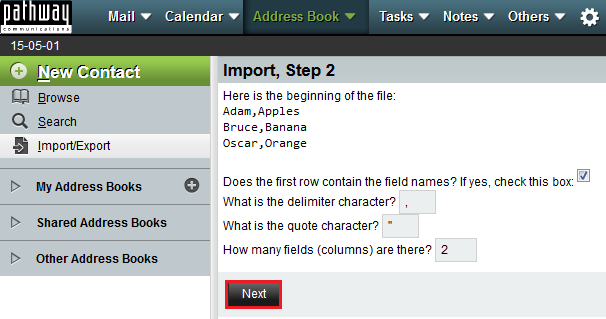
- Select the checkbox if the first row of your CSV file contains content.
- The delimiter and quote character fields can be left alone. Only edit these fields if you have customized your delimiters or quote characters.
- Specify how many columns are in use in your CSV file.
- Click Next.
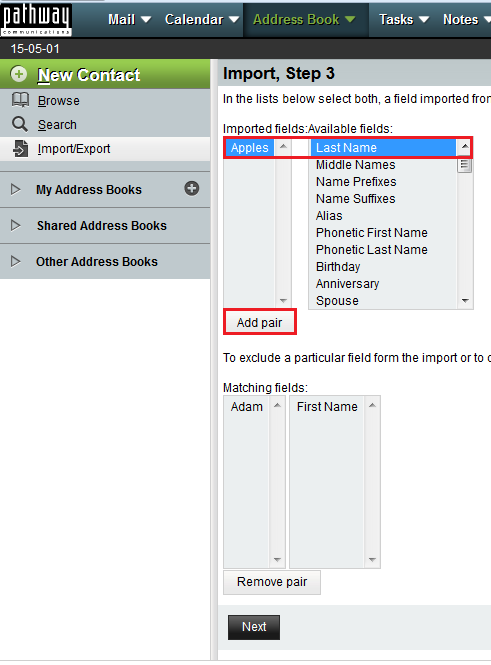
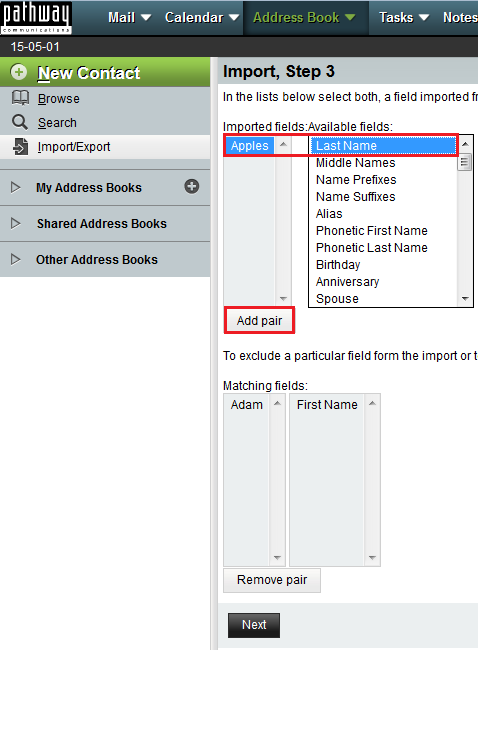
- Select a field from the Imported Fields list.
- Select a matching field from the Available Fields list. (You don't need to find an exact match.)
- Click Add Pair.
- Repeat steps 13 to 15 as many times as required and then proceed to step 17.
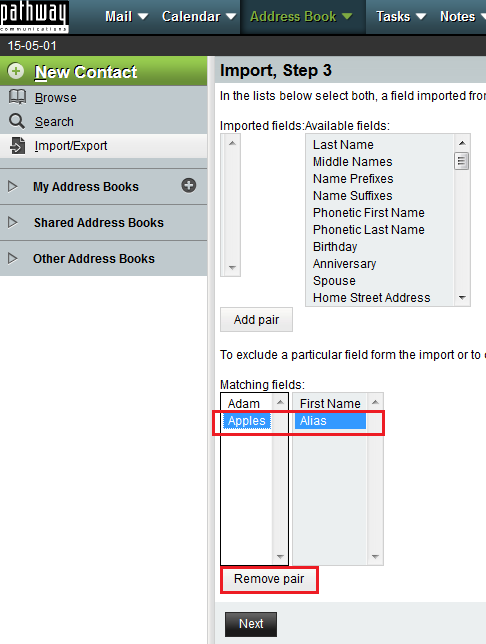
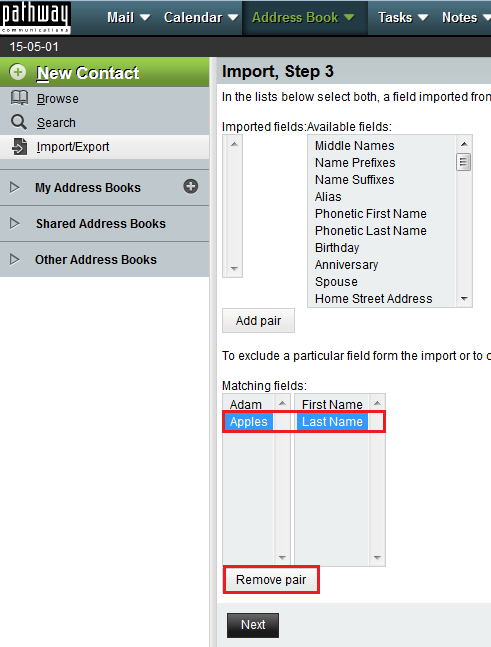
- (Only perform if needed, otherwise proceed to step 18) If you need to exclude a pair, select the items from the Matching Fields lists, and then click Remove Pair.
- Click Next.
The file will be added to your address book.
Import a Tab separated values file
To import a Tab separated values address book file:
- Log in to EasyMail.
- Click the the Address Book tab.
- Click Import/Export.
- Select Tab separated values from the Select the format of the source file dropdown list.
- Select the checkbox if you would like to overwrite an existing addressbook. IMPORTANT: this will delete all the entries in your current address book.
- Select an address book from the Select the address book to import to dropdown list.
- Click Browse to select a file to import.
- Click Next.
- Select the checkbox if the first row of your tab separated values file contains content.
- Click Next.
- Select a field from the Imported Fields list.
- Select a matching field from the Available Fields list. (You don't need to find an exact match.)
- Click Add Pair.
- Repeat steps 11 to 13 as many times as required and then proceed to step 15.
- (Only perform if needed, otherwise proceed to step 16) If you need to exclude a pair, select the items from the Matching Fields lists, and then click Remove Pair.
- Click Next.
Your file will be added to the address book.
Import a vCard file
To import a vCard address book file:
- Log in to EasyMail.
- Click the the Address Book tab.
- Click Import/Export.
- Select vCard from the Select the format of the source file dropdown list.
- Select the checkbox if you would like to overwrite an existing addressbook. IMPORTANT: this will delete all the entries in your current address book.
- Select an address book from the Select the address book to import to dropdown list.
- Click Browse to select a file to import.
- Click Next.
The file will be added to your address book.
Import a Mulberry Address Book file
To import a Mulberry Address Book file:
- Log in to EasyMail.
- Click the the Address Book tab.
- Click Import/Export.
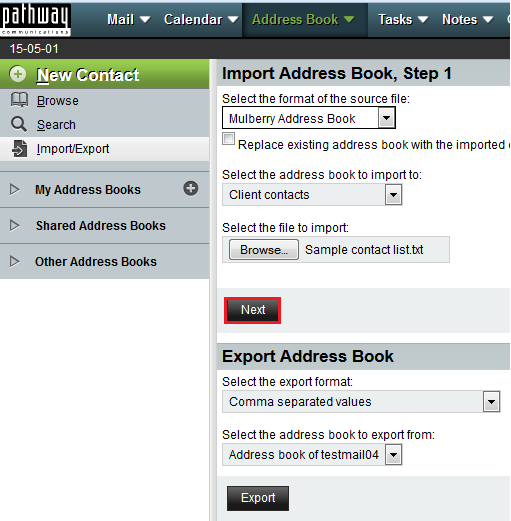
- Select Mulberry Address Book from the Select the format of the source file dropdown list.
- Select the checkbox if you would like to overwrite an existing addressbook. IMPORTANT: this will delete all the entries in your current address book.
- Select an address book from the Select the address book to import to dropdown list.
- Click Browse to select a file to import.
- Click Next.
- Select the checkbox if the first row of your tab separated values file contains content.
- Click Next.
- Select a field from the Imported Fields list.
- Select a matching field from the Available Fields list. (You don't need to find an exact match.)
- Click Add Pair.
- Repeat steps 11 to 13 as many times as required and then proceed to step 15.
- (Only perform if needed, otherwise proceed to step 16) If you need to exclude a pair, select the items from the Matching Fields lists, and then click Remove Pair.
- Click Next.
Your file will be added to the address book.
Import a Pine Address Book file
To import a Pine Address Book file:
- Log in to EasyMail.
- Click the the Address Book tab.
- Click Import/Export.
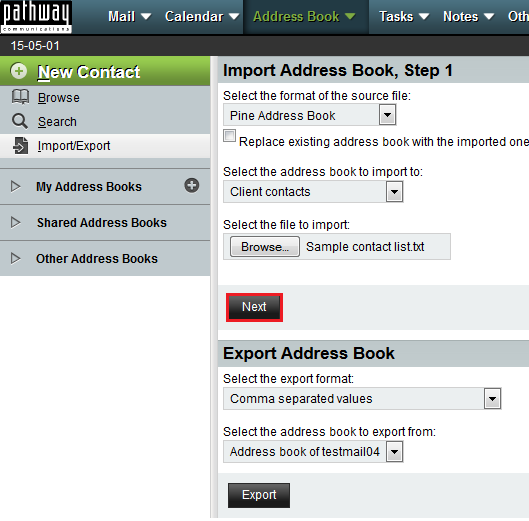
- Select Pine Address Book from the Select the format of the source file dropdown list.
- Select the checkbox if you would like to overwrite an existing addressbook. IMPORTANT: this will delete all the entries in your current address book.
- Select an address book from the Select the address book to import to dropdown list.
- Click Browse to select a file to import.
- Click Next.
- Select the checkbox if the first row of your tab separated values file contains content.
- Click Next.
- Select a field from the Imported Fields list.
- Select a matching field from the Available Fields list. (You don't need to find an exact match.)
- Click Add Pair.
- Repeat steps 11 to 13 as many times as required and then proceed to step 15.
- (Only perform if needed, otherwise proceed to step 16) If you need to exclude a pair, select the items from the Matching Fields lists, and then click Remove Pair.
- Click Next.
Your file will be added to the address book.
Import a LDIF Address Book file
To import a LDIF Address Book file:
- Log in to EasyMail.
- Click the the Address Book tab.
- Click Import/Export.
- Select LDIF Address Book from the Select the format of the source file dropdown list.
- Select the checkbox if you would like to overwrite an existing addressbook. IMPORTANT: this will delete all the entries in your current address book.
- Select an address book from the Select the address book to import to dropdown list.
- Click Browse to select a file to import.
- Click Next.
- Select the checkbox if the first row of your file contains content.
- The delimiter and quote character fields can be left alone. Only edit these fields if you have customized your delimiters or quote characters.
- Specify how many columns are in use in your file.
- Click Next.
- Select a field from the Imported Fields list.
- Select a matching field from the Available Fields list. (You don't need to find an exact match.)
- Click Add Pair.
- Repeat steps 13 to 15 as many times as required and then proceed to step 17.
- (Only perform if needed, otherwise proceed to step 18) If you need to exclude a pair, select the items from the Matching Fields lists, and then click Remove Pair.
- Click Next.
The file will be added to your address book.


