Difference between revisions of "Editing an EasyMail address book"
Your guide to pathway services
| (5 intermediate revisions by one user not shown) | |||
| Line 22: | Line 22: | ||
<ol start="5"> | <ol start="5"> | ||
| − | <li> | + | <li>''(Optional)'' In the '''Name''' field, enter a new name for the address book.</li> |
| − | <li> | + | <li>''(Optional)'' In the '''Description '''field, enter a new description for the address book.</li> |
| + | <li>''(Optional)'' To change address book permissions, click '''Change Permissions'''.</li> | ||
</ol> | </ol> | ||
| + | |||
| + | <br/>[[File:EasyMail create addressbook2.png|none|EasyMail create addressbook2.png]] | ||
| + | |||
| + | |||
| + | <ol start="8"> | ||
| + | <li>''(Optional)'' In the '''Owner''' field, enter the EasyMail username of the new owner of this address book. Address books can be assigned to other users.</li> | ||
| + | <li>''(Optional) ''Set the permissions for the address book by filling in the applicable fields.</li> | ||
| + | <li>Click '''Save and Finish'''.</li> | ||
| + | </ol> | ||
| + | |||
| + | |||
| + | |||
| + | [[File:EasyMail create addressbook3.png|none|EasyMail create addressbook3.png]] | ||
| + | |||
| + | |||
| + | <ol start="11"> | ||
| + | <li>Click '''Save'''.</li> | ||
| + | </ol> | ||
| + | |||
| + | |||
| + | |||
| + | Your address book details are now updated. | ||
Latest revision as of 13:46, 11 June 2015
To edit the details of an EasyMail address book:
- Log in to EasyMail.
- Click the the Address Book tab.
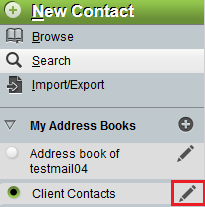
- Expand the My Address Books pane.
- Click the Edit icon (pencil) beside the address book that you would like to edit.
- (Optional) In the Name field, enter a new name for the address book.
- (Optional) In the Description field, enter a new description for the address book.
- (Optional) To change address book permissions, click Change Permissions.
- (Optional) In the Owner field, enter the EasyMail username of the new owner of this address book. Address books can be assigned to other users.
- (Optional) Set the permissions for the address book by filling in the applicable fields.
- Click Save and Finish.
- Click Save.
Your address book details are now updated.


