Difference between revisions of "Scheduling calendar events in EasyMail"
Your guide to pathway services
m (Protected "Scheduling calendar events in EasyMail" ([Edit=Allow only administrators] (indefinite) [Move=Allow only administrators] (indefinite)) [cascading]) |
|||
| (One intermediate revision by one user not shown) | |||
| Line 1: | Line 1: | ||
| − | + | Events such as meetings or appointments can be added to your calendar. | |
| + | |||
| + | |||
| + | |||
| + | To schedule a calendar event: | ||
| + | |||
| + | |||
| + | |||
| + | #Log in to EasyMail. | ||
| + | #Click the '''Calendar '''tab. | ||
| + | |||
| + | |||
| + | |||
| + | [[File:EasyMail calendar tab.png]] | ||
| + | |||
| + | |||
| + | <ol start="3"> | ||
| + | <li>Click '''New Event'''.</li> | ||
| + | </ol> | ||
| + | |||
| + | |||
| + | |||
| + | [[File:EasyMail new event1.png]] | ||
| + | |||
| + | |||
| + | <ol start="4"> | ||
| + | <li>In the '''Event title '''field, enter a title for your event.</li> | ||
| + | <li>In the '''From '''field, enter a date, or click the calendar icon and select a date.</li> | ||
| + | <li>Select a time for the event. </li> | ||
| + | <li>From the '''Status '''dropdown list, select a status.</li> | ||
| + | <li>In the '''Location '''field, enter the event location.</li> | ||
| + | <li>From the '''Add event to '''dropdown list, select the calendar you would like to add the event to.</li> | ||
| + | <li>Select the '''Private '''checkbox if your would like to hide the event details on your calendar.</li> | ||
| + | <li>In the '''Description '''field, enter your event details.</li> | ||
| + | </ol> | ||
| + | |||
| + | |||
| + | |||
| + | [[File:EasyMail new event2.png]] | ||
| + | |||
| + | |||
| + | <ol start="12"> | ||
| + | <li>Click '''Reminder'''.</li> | ||
| + | <li>''(Optional) ''Set a custom reminder by modifying the applicable fields.</li> | ||
| + | </ol> | ||
| + | |||
| + | |||
| + | |||
| + | [[File:EasyMail new event3.png]] | ||
| + | |||
| + | |||
| + | <ol start="14"> | ||
| + | <li>Click '''Repeat'''.</li> | ||
| + | <li>Specify the event frequency by selecting the applicable checkboxes, and filling in the neccessary fields. </li> | ||
| + | </ol> | ||
| + | |||
| + | |||
| + | |||
| + | [[File:EasyMail new event4.png]] | ||
| + | |||
| + | |||
| + | <ol start="16"> | ||
| + | <li>Click '''URL'''.</li> | ||
| + | <li>''(Optional) ''Enter a web url if one is required.</li> | ||
| + | </ol> | ||
| + | |||
| + | |||
| + | |||
| + | [[File:EasyMail new event5.png]] | ||
| + | |||
| + | |||
| + | <ol start="18"> | ||
| + | <li>Click '''Attendees'''.</li> | ||
| + | <li>Enter the email addresses of the event attendees. Separate email addresses using a comma.</li> | ||
| + | </ol> | ||
| + | |||
| + | |||
| + | |||
| + | [[File:EasyMail new event6.png]] | ||
| + | |||
| + | |||
| + | <ol start="20"> | ||
| + | <li>Click '''Tags'''.</li> | ||
| + | <li>''(Optional) ''Enter tags to make the event easier to find. Separate tags using a comma.</li> | ||
| + | <li>Click '''Save'''.</li> | ||
| + | </ol> | ||
| + | |||
| + | |||
| + | |||
| + | [[File:EasyMail new event7.png]] | ||
Latest revision as of 14:59, 22 June 2015
Events such as meetings or appointments can be added to your calendar.
To schedule a calendar event:
- Log in to EasyMail.
- Click the Calendar tab.
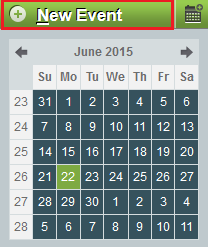
- Click New Event.
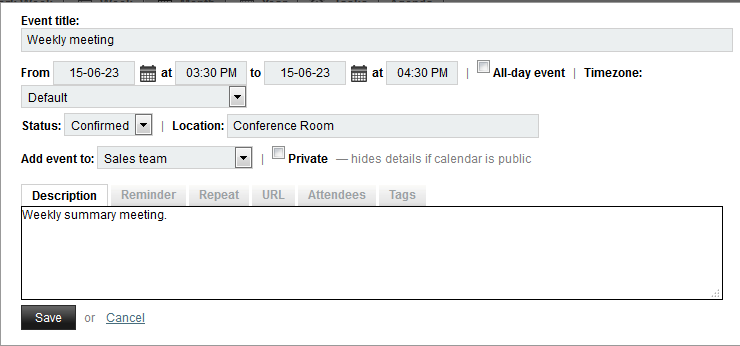
- In the Event title field, enter a title for your event.
- In the From field, enter a date, or click the calendar icon and select a date.
- Select a time for the event.
- From the Status dropdown list, select a status.
- In the Location field, enter the event location.
- From the Add event to dropdown list, select the calendar you would like to add the event to.
- Select the Private checkbox if your would like to hide the event details on your calendar.
- In the Description field, enter your event details.
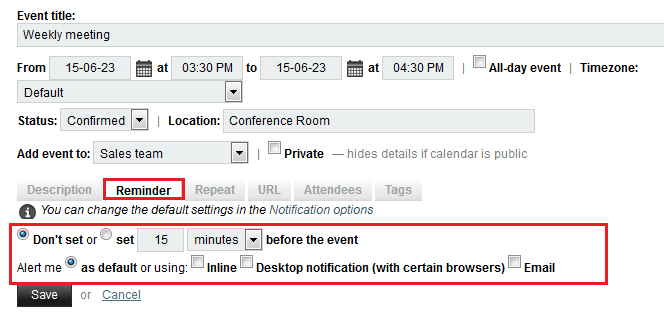
- Click Reminder.
- (Optional) Set a custom reminder by modifying the applicable fields.
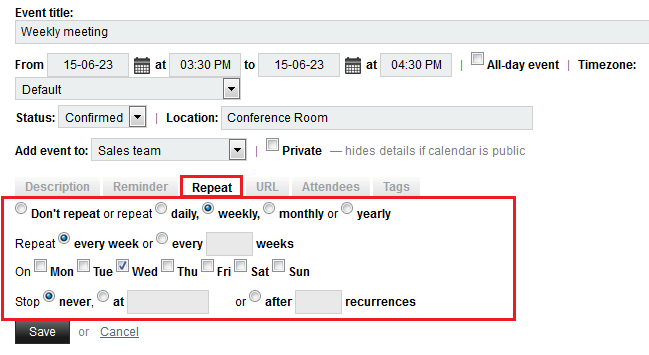
- Click Repeat.
- Specify the event frequency by selecting the applicable checkboxes, and filling in the neccessary fields.
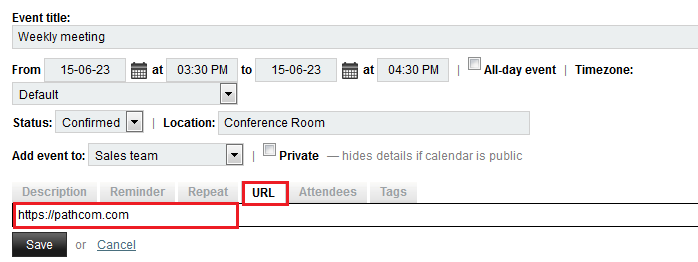
- Click URL.
- (Optional) Enter a web url if one is required.
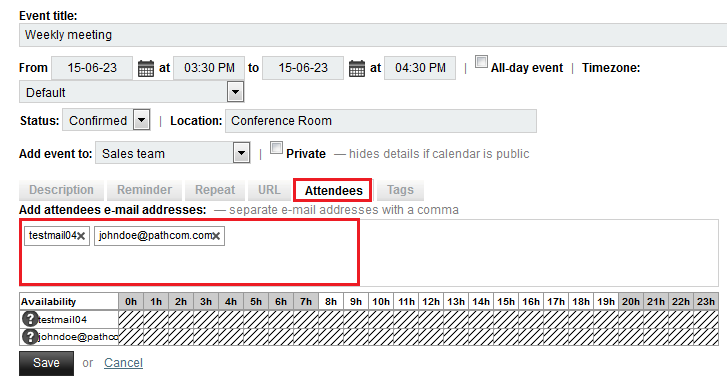
- Click Attendees.
- Enter the email addresses of the event attendees. Separate email addresses using a comma.
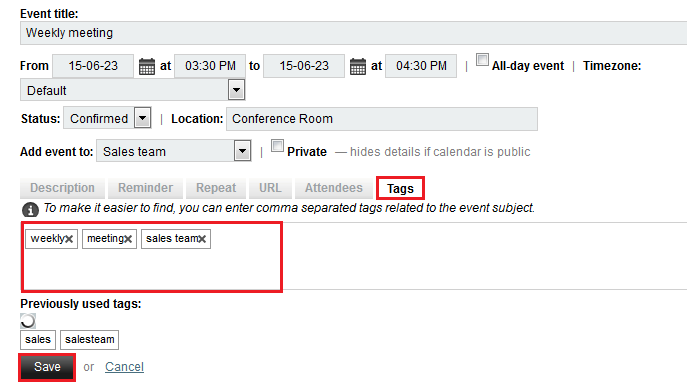
- Click Tags.
- (Optional) Enter tags to make the event easier to find. Separate tags using a comma.
- Click Save.


