Difference between revisions of "Configuring FortiMail User Preferences"
Your guide to pathway services
| (One intermediate revision by one user not shown) | |||
| Line 1: | Line 1: | ||
| − | Administrators are able to configure the | + | Administrators are able to configure the white list preferences and webmail quarantine language for specific email users by using the '''<span class="GUI_Element">User Preferences</span>''' tab. |
| + | |||
| + | |||
To view or manage existing user preferences: | To view or manage existing user preferences: | ||
| Line 23: | Line 25: | ||
<li>From the '''Theme dropdown list, select a theme for the user.'''</li> | <li>From the '''Theme dropdown list, select a theme for the user.'''</li> | ||
<li>From the '''Idle timeout''' dropdown list, select how long the user can be idle before being timed out.</li> | <li>From the '''Idle timeout''' dropdown list, select how long the user can be idle before being timed out.</li> | ||
| − | <li>Select whether or not you would like to automatically add outgoing email addresses to the user's | + | <li>Select whether or not you would like to automatically add outgoing email addresses to the user's white list. (Select the applicable checkbox).</li> |
<li>Select whether or not spam reports will be generated for the user. (Select the applicable checkbox.)</li> | <li>Select whether or not spam reports will be generated for the user. (Select the applicable checkbox.)</li> | ||
<li>''(Optional)'' Click an email address to view user preferences of that primary email account.</li> | <li>''(Optional)'' Click an email address to view user preferences of that primary email account.</li> | ||
Latest revision as of 14:30, 27 May 2014
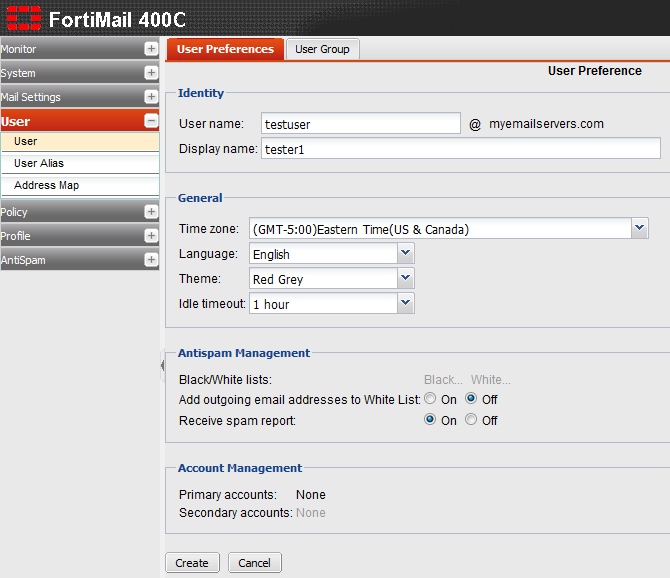
Administrators are able to configure the white list preferences and webmail quarantine language for specific email users by using the User Preferences tab.
To view or manage existing user preferences:
- Log in to FortiMail.
- Expand the User pane.
- Click User.
- Click the User Preferences tab.
- Click New..., or double-click one of the listed user's to modify their preferences.
- In the User name field, enter a username for the user.
- In the Display name field, enter the display name for the user.
- From the Time zone dropdown list, select the user's time zone.
- From the Language dropdown list, select the user's language.
- From the Theme dropdown list, select a theme for the user.
- From the Idle timeout dropdown list, select how long the user can be idle before being timed out.
- Select whether or not you would like to automatically add outgoing email addresses to the user's white list. (Select the applicable checkbox).
- Select whether or not spam reports will be generated for the user. (Select the applicable checkbox.)
- (Optional) Click an email address to view user preferences of that primary email account.
- (Optional) Click None or an email address to add or remove secondary accounts.
- If this is a new user, click Create. If this is an existing user, click OK to update the user's preferences.


