Difference between revisions of "Configuring Blacklists in EasyMail"
Your guide to pathway services
| Line 31: | Line 31: | ||
=== '''Adding entries to your Blacklist'''<br/> === | === '''Adding entries to your Blacklist'''<br/> === | ||
| − | + | <span style="color:#0000ff">Perform steps 1-3 from the '''Viewing your Blacklist '''section before performing the steps below.</span> | |
| Line 46: | Line 46: | ||
=== '''Modifying your Blacklist actions'''<br/> === | === '''Modifying your Blacklist actions'''<br/> === | ||
| − | + | <span style="color:#0000ff">Perform steps 1-3 from the '''Viewing your Blacklist '''section before performing the steps below.</span> | |
<br/>Select one of the following options: | <br/>Select one of the following options: | ||
| Line 75: | Line 75: | ||
=== '''Removing Entries from your Blacklist'''<br/> === | === '''Removing Entries from your Blacklist'''<br/> === | ||
| − | + | <span style="color:#0000ff">Perform steps 1-3 from the '''Viewing your Blacklist '''section before performing the steps below.</span> | |
Revision as of 14:53, 27 January 2015
EasyMail allows users to add and delete Blacklist entries.
Contents |
Viewing your Blacklist
To view your Blacklist:
- Log in to EasyMail.
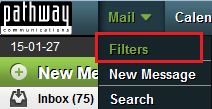
- From the Mail dropdown tab, click Filters.
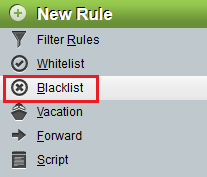
- From the Rule pane, select Blacklist.
Editing your Blacklist
Adding entries to your Blacklist
Perform steps 1-3 from the Viewing your Blacklist section before performing the steps below.
- In the Enter each address on a new line field, type the email addresses that you would like to add to the whitelist. (Enter each email address on a separate line).
- Click Save.
Modifying your Blacklist actions
Perform steps 1-3 from the Viewing your Blacklist section before performing the steps below.
Select one of the following options:
A) If you would like to automatically delete all blacklisted emails:
- Select the Delete message completely checkbox.
- Click Save.
OR
B) If you would like to automatically move blacklisted emails to a specific folder:
- Select the Move message to folder checkbox.
- Select the Select target folder dropdown arrow, and select a folder from the list.
- Click Save.
Removing Entries from your Blacklist
Perform steps 1-3 from the Viewing your Blacklist section before performing the steps below.
- In the Enter each address on a new line field,delete email addresses that you would like to delete from the blacklist.
- Click Save.
Notifications will appear after you save your blacklist.


