Difference between revisions of "Creating a new ticket"
Your guide to pathway services
| Line 8: | Line 8: | ||
== '''Options'''<br/> == | == '''Options'''<br/> == | ||
| − | |||
Option 1: | Option 1: | ||
| Line 17: | Line 16: | ||
| − | [[File:Locate search menu exchange.PNG|none]] | + | [[File:Locate search menu exchange.PNG|none|Locate search menu exchange.PNG]] |
| Line 27: | Line 26: | ||
| − | [[File:Search new ticket exchange.png|none]] | + | [[File:Search new ticket exchange.png|none|Search new ticket exchange.png]] |
| − | <ol start=" | + | |
| + | |||
| + | <ol start="5"> | ||
<li>Include the necessary information and click '''Create Ticket''' <span style="color:#0000cd">(Scroll down to the '''Submit a New Trouble Ticket page '''section for full deta</span><span style="color:#0000cd">ils).</span></li> | <li>Include the necessary information and click '''Create Ticket''' <span style="color:#0000cd">(Scroll down to the '''Submit a New Trouble Ticket page '''section for full deta</span><span style="color:#0000cd">ils).</span></li> | ||
</ol> | </ol> | ||
| Line 34: | Line 35: | ||
| − | Option 2: | + | Option 2: |
#Log in to the MyExchange Hosting Controller. | #Log in to the MyExchange Hosting Controller. | ||
| Line 40: | Line 41: | ||
#Click the '''+ '''(expand) icon to expand the '''Trouble Ticket '''pane (if the pane is not already expanded by default). | #Click the '''+ '''(expand) icon to expand the '''Trouble Ticket '''pane (if the pane is not already expanded by default). | ||
#Click '''New Ticket'''. | #Click '''New Ticket'''. | ||
| − | + | ||
| + | |||
| + | |||
| + | [[File:New ticket side bar exchange.png|none|New ticket side bar exchange.png]] | ||
| + | |||
| + | |||
| + | <ol start="5"> | ||
| + | <li>Include the necessary information and click '''Create Ticket''' <span style="color:#0000cd">(Scroll down to the '''Submit a New Trouble Ticket page '''section for full deta</span><span style="color:#0000cd">ils).</span></li> | ||
| + | </ol> | ||
== Submit a New Trouble Ticket page<br/> == | == Submit a New Trouble Ticket page<br/> == | ||
| + | |||
| + | |||
| + | |||
| + | When you arrive at the '''Submit a New Trouble Ticket '''page: | ||
| + | |||
| + | |||
| + | |||
| + | #From the '''Category Name''' dropdown list, select an option that best describes your problem. | ||
| + | #From the '''Priority '''dropdown list, make a selection based on the significance of the problem. | ||
| + | #Select the '''Solution by Email also''' checkbox if you would like a copy of the ticket to be sent to your email. | ||
| + | #In the '''Subject''' field, create a subject heading that describes your problem. | ||
| + | #In the '''Problem ''''''Details '''field, briefly describe the problem that you are having. | ||
| + | #''(Optional)'' Click '''Browse''' to attach a file, such as a screenshot, to your ticket. | ||
| + | #Click '''Create Ticket'''. | ||
| + | |||
| + | |||
| + | |||
| + | [[File:Create a new ticket in myexchange.PNG|none]] | ||
Revision as of 14:28, 24 April 2014
Users experiencing technical issues have the ability to create support request tickets within the MyExchange Hosting Controller.
To create a new support ticket choose one of the following options:
Options
Option 1:
- Log in to the MyExchange Hosting Controller.
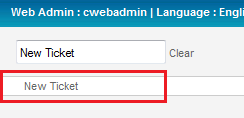
- Locate the search bar.
- Search for "New Ticket".
- Select New Ticket from the search results.
- Include the necessary information and click Create Ticket (Scroll down to the Submit a New Trouble Ticket page section for full details).
Option 2:
- Log in to the MyExchange Hosting Controller.
- From the side menu, locate the Help pane and click the + (expand) icon to expand the pane (if the pane is not already expanded by default).
- Click the + (expand) icon to expand the Trouble Ticket pane (if the pane is not already expanded by default).
- Click New Ticket.
- Include the necessary information and click Create Ticket (Scroll down to the Submit a New Trouble Ticket page section for full details).
Submit a New Trouble Ticket page
When you arrive at the Submit a New Trouble Ticket page:
- From the Category Name dropdown list, select an option that best describes your problem.
- From the Priority dropdown list, make a selection based on the significance of the problem.
- Select the Solution by Email also checkbox if you would like a copy of the ticket to be sent to your email.
- In the Subject field, create a subject heading that describes your problem.
- In the 'Problem 'Details field, briefly describe the problem that you are having.
- (Optional) Click Browse to attach a file, such as a screenshot, to your ticket.
- Click Create Ticket.


