Editing resource settings
Your guide to pathway services
Administrators are able to edit the resource settings for individual resource mailboxes.
To edit resource settings:
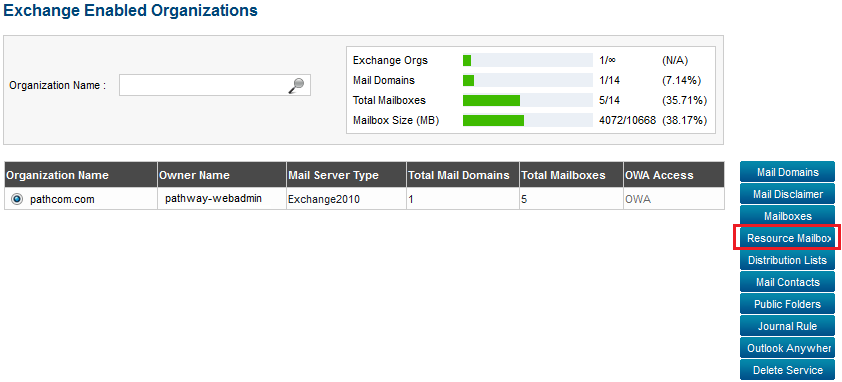
From the Exchange Enabled Organizations page:
(Click here for instructions on how to get to this page)
- Select an organization from the list.
- Click Resource Mailboxes.
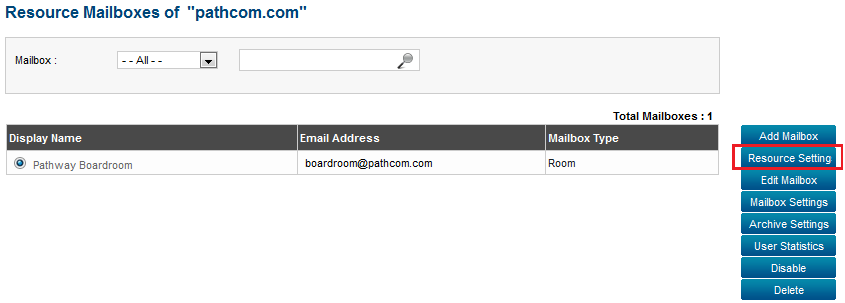
- From the list of resources mailboxes, select the mailbox that you would like to edit.
- Click Resource Settings.
Contents |
Resource Settings tab
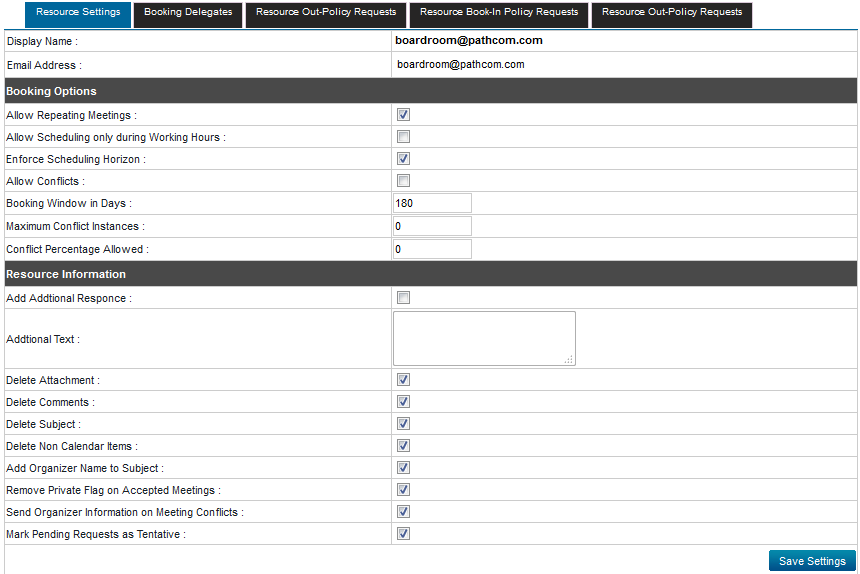
The Resource Settings tab allows administrators to modify things like booking options and resource information.
- If you would like to enable recurring meetings, select the Allow Repeating Meetings checkbox.
- If you would like to restrict scheduling to work hours, select the Allow Scheduling only during Working hours checkbox.
- If you would like to implement a scheduling horizon, select the Enforce Scheduling horizon checkbox.
- If you would like to allow scheduling conflicts to occur, select the Allow Conflicts checkbox.
- In the Booking Window in Days field, enter the number of days the booking window will be open.
- In the Maximum Conflict Instances field, enter the maximum number of allowable conflicts.
- In Conflict Percentage allowed field, enter the percentage of conflicts that are allowed to occur.
- To provide users with multiple responses, select the Add Additional Response checkbox.
- In the Additional Text field, enter the text that will be displayed for additional responses.
- If you would like to delete message attachments, select the Delete Attachment checkbox.
- If you would like to delete comments, select the Delete Comments checkbox.
- If you would like to delete message subjects, select the Delete Subject checkbox.
- If you would like to delete non calendar items, select the Delete Non Calendar Items checkbox.
- If you would like to add the event organizer's name to the message subject, select the Add Organizer Name to Subject checkbox.
- If you would like to remove private flags from accepted meetings, select the Remove Private Flag on Accepted Meetings checkbox.
- If you would like meeting conflict updates to be sent to the event organizer, select the Send Organizer Information on Meeting Conflicts.
- If you would like to mark pending requests as tentative, select the Mark Pending Requests as Tentative checkbox.
- Click Save Settings.
Booking Delegates tab
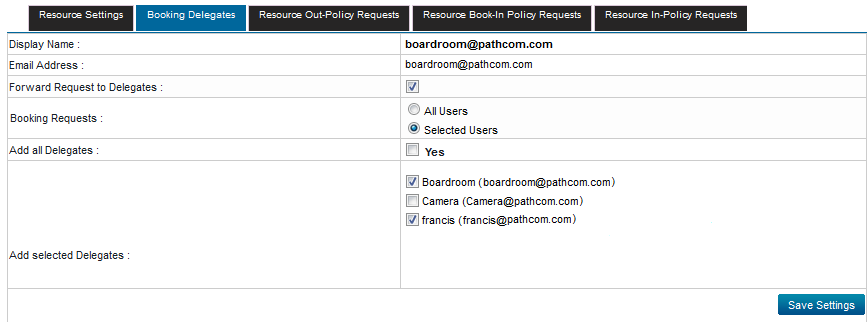
The Booking Delegates tab allows administrators to forward booking requests to specified mailboxes.
- If you would like to send forward requests to delegates, select the Forward Request to Delegates checkbox.
To send forward requests to all delegates:
- Select the All Users checkbox.
- Select the Yes checkbox to add all delegates.
- Click Save Settings.
To send forward requests to only selected delegates:
- Select the Selected Users checkbox.
- In the Add selected delegates section, select the checkbox beside the appropriate delegates.
- Click Save Settings.
Resource Out-Policy Requests tab
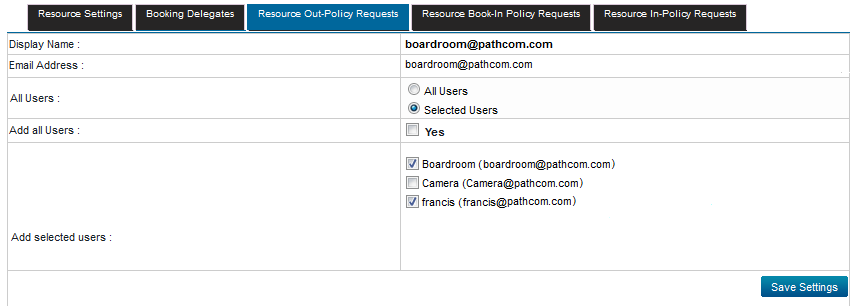
The Resource Out-Policy Requests tab allows administrators to forward out-policy requests to specified mailboxes.
To send resource out-policy requests to all users:
- Select the All Users checkbox.
- Select the Yes checkbox to add all users.
- Click Save Settings.
To send resource out-policy requests to only selected users:
- Select the Selected Users checkbox.
- In the Add selected Users section, select the checkbox beside the appropriate users.
- Click Save Settings.
Resource Book-In Policy Requests tab
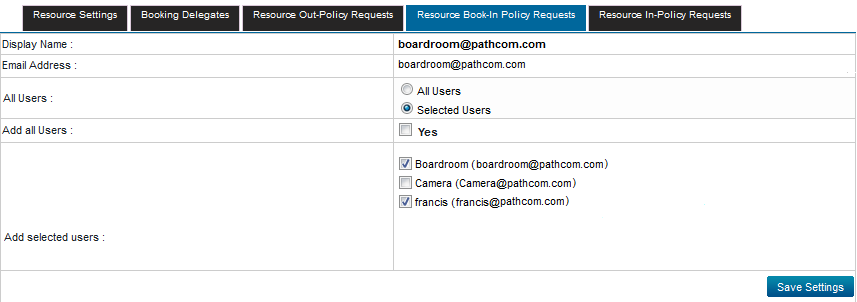
The Resource Book-In Policy Requests tab allows administrators to forward book-in policy requests to specified mailboxes.
To send resource book-in policy requests to all users:
- Select the All Users checkbox.
- Select the Yes checkbox to add all users.
- Click Save Settings.
To send resource book-in policy requests to only selected users:
- Select the Selected Users checkbox.
- In the Add selected Users section, select the checkbox beside the appropriate users.
- Click Save Settings.
Resource In-Policy Requests tab
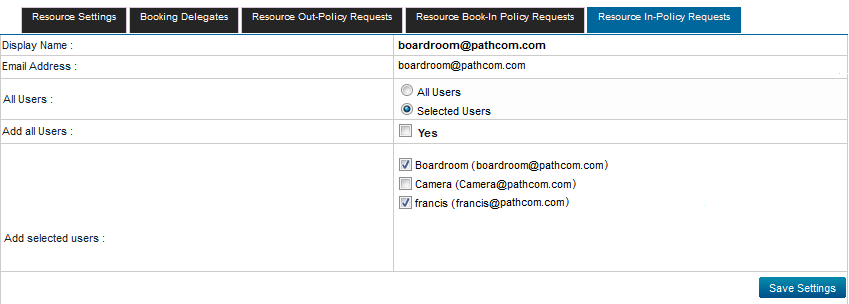
The Resource In-Policy Requests tab allows administrators to forward in-policy requests to specified mailboxes.
To send resource in-policy requests to all users:
- Select the All Users checkbox.
- Select the Yes checkbox to add all users.
- Click Save Settings.
To send resource in-policy requests to only selected users:
- Select the Selected Users checkbox.
- In the Add selected Users section, select the checkbox beside the appropriate users.
- Click Save Settings.


