Difference between revisions of "Creating a Workspace that connects to a mailbox"
Your guide to pathway services
| Line 10: | Line 10: | ||
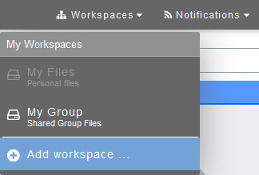
[[File:Create a Workspace.png|none|Create a Workspace.png]] | [[File:Create a Workspace.png|none|Create a Workspace.png]] | ||
| − | :: | + | ::<div class="floatnone"><br/></div><div class="floatnone"><br/></div> |
<ol start="3"> | <ol start="3"> | ||
<li>From the '''Create your own workspace '''pop-up window, select the '''Mailbox '''template.</li> | <li>From the '''Create your own workspace '''pop-up window, select the '''Mailbox '''template.</li> | ||
| Line 17: | Line 17: | ||
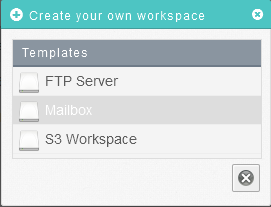
| − | [[File:Create your own workspace mailbox.png|none]] | + | [[File:Create your own workspace mailbox.png|none|Create your own workspace mailbox.png]] |
| − | :: | + | ::<div class="floatnone"><br/></div><div class="floatnone"><br/></div> |
<ol start="4"> | <ol start="4"> | ||
<li>In the '''Label '''field, enter a name for the workspace.</li> | <li>In the '''Label '''field, enter a name for the workspace.</li> | ||
| Line 32: | Line 32: | ||
<li>Click the checkmark.</li> | <li>Click the checkmark.</li> | ||
</ol> | </ol> | ||
| + | |||
| + | |||
| + | |||
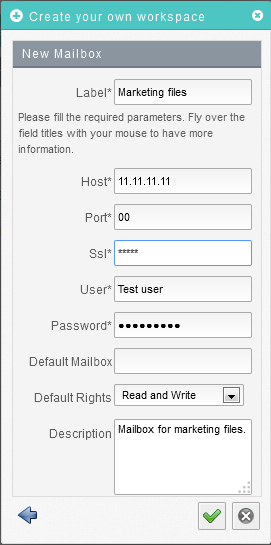
| + | [[File:Create a new storig mailbox.png|none]] | ||
Latest revision as of 10:55, 6 June 2014
To create a new workspace that connects to a mailbox:
- Place your cursor over the Workspace tab.
- Click Add workspace...
- From the Create your own workspace pop-up window, select the Mailbox template.
- In the Label field, enter a name for the workspace.
- In the Host field, enter the mailbox hostname.
- In the Port field, enter the IP address of the mailbox port.
- In the SSL field, enter the SSL security key of the mailbox.
- In the User field, enter the mailbox username.
- In the Password field, enter the mailbox password.
- In the Default Mailbox field, enter the mailbox to connect to by default.
- From the Default Rights dropdown list, select the default read and write access rights for the user.
- In the Description field, enter a description for the workspace.
- Click the checkmark.


